Hole 1 (Streteley)
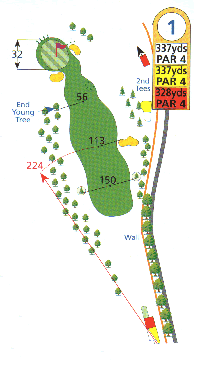
A nice straightforward starting hole, ‘Streteley’ is a ‘what you see, is what you get’ hole measuring 337 yards . A generous fairway only has one bunker to catch the pushed drive at 224 yards, while the generous green is 32 yards deep.
Pro’s Advice
Off to a relatively easy start with a drive and a short iron. The main objective is to avoid the road and the bunker on the right.
Member’s Advice
A relatively simple hole to start you off, but it is amazing how easy it is to be drawn by the out of bounds on the right. However, the smart play is to aim left. There is lots a of room on the fairway, and even if you do miss it to the left, the trees usual leave you with some sort of shot at the green.
For the Ladies
A relatively simple hole to start you off. The bunker on the right is out of reach for all but the longest hitters. Trees to the left can cause a problem if you are wayward off the tee and there is out of bounds all down the right. The green is well guarded by bunkers, but if the flag is towards the middle or back, just take one extra club!
Hole 2 (Quarry Leaze)
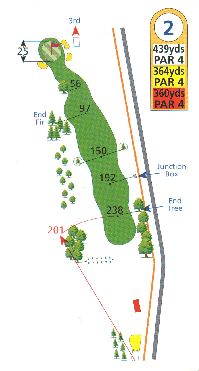
A long par four, the second hole has another generous fairway. There is out of bounds to the right, but this shouldn’t really come into play with such a wide fairway. The green is large, but the entrance protected by two bunkers.
Pro’s Advice:
A testing par 4 on any day. You will find that by favouring the left hand side of the fairway, it can play one or two clubs shorter than the right, but you have to take care not to go too far left, otherwise your view of the green will be obscured by trees.
Member’s Advice
There’s a big fairway in front of you, so the out of bounds to the right shouldn’t trouble too many. You need to drive as close to the trees on the left however, which means if you overdo it you’re left with a blind shot over said trees to the big green, where three large bunkers also lay in wait for you. If you enjoy driving though, you’ll really enjoy this hole.
For the Ladies
This is a tough par 4 due mainly to its length. A good drive down the middle is required, but if you are too far left you will be blocked out by the large fir trees. Too far right and you have a very long shot into the green. A 3 shotter for most ‘handicappers’
Hole 3 (Rushmoor)
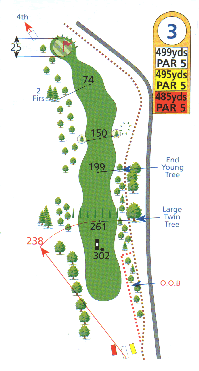
Rushmoor is a 499 yard hole that plays a lot shorter than its yardage if you can get a good drive away. Be cautious of the out of bounds on the left, but a good drive leaves the green within reach as the downhill slope of the fairway can kick the ball forward, gaining you valuable extra yards. But be sure to take some time to enjoy the fabulous views from the top of the hill, where it is said you can see seven counties.
Pro’s Advice
Here is a good chance for a birdie. Again, just left of centre is favoured and your shot to the green can kick right if it lands short.
Member’s Advice
The tee shot is blind for the longer hitters and the aim is to hit catch fairway and let your ball find the downslope to gain 50 or 60 extra yards of roll. But the out of bounds on the right always whispers in your ear that you right handers might slice it! Once on the lower fairway however, its the green that will present the problems with its gentle slope to the right. But play your cards right, and you could be rewarded with a birdie here.
For the Ladies
A relatively straightforward par 5 so long as you haven’t got a slice off the tee as out of bounds awaits. Anywhere down the middle will give you a good view of your second shot. The shot into the green is tricky whenever the ground is hard as the green slopes away from you and it is hard to get the ball to stay on the green. Any putt above the hole will need a great deal of care!!
Hole 4 (Newmans Wood)
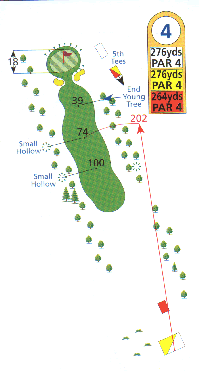
A nice short hole with a wide fairway to a wide raised green. Two bunkers guard the front of the green to catch the off-line shots that land short, but the bank at the slope of the green usually helps balls that land slightly too long to roll back onto the fringe.
Pro’s Advice
A short par 4 with the only problems being two bunkers in front of the green. As the green is raised, judging the distance to the flag can sometimes be tricky, but there are plenty of options off the tee to leave you with the second shot you favour the most.
Member’s Advice
A short shot that with the wind behind some try to drive – few with any success. The green is elevated, so judging distance for the second shot is the problem, especially as two bunkers and a slope wait at the front to gather up your ball. A good hole to par, a great one to birdie.
For the Ladies
A short hole which is relatively easy to par or even birdie so long as you get your tee shot away. The second shot is to a raised green guarded by bunkers so you need to take one more club than you think. For the longest of hitters the green is in range in the summer with the wind behind!
Hole 5 (Haw Furlong)
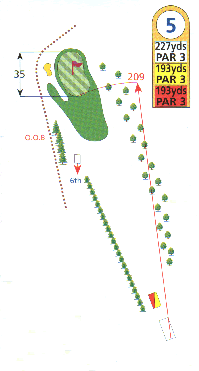
A long par 3 that measures 227 yards from the back tee. A straight drive is demanded to a deep green that slopes slightly from right to left. There is a bunker back left to catch the longer shots, but it doesn’t often see too much action.
Pro’s Advice
Not an easy par 3. It usually calls for a long iron or even a wood which needs to land between the middle and right hand side of the green as it tends to fall slightly to the left.
Member’s Advice
A long par 3 that demands a good shot if you are to reach it. Once at the green, it slopes to the left and is always fast, so don’t be too bold with your putting.
For the Ladies
A very long par 3 that demands a good shot if you are to reach it. A hedge plus out of bounds lurk on the left, a plantation catches many shots on the right. The green is large and slopes from right to left. A three putt is always on the cards unless you have a ‘straight uphill’ putt. For most ladies a 4 is a good score on this hole.
Hole 6 (Kestrels Ridge)
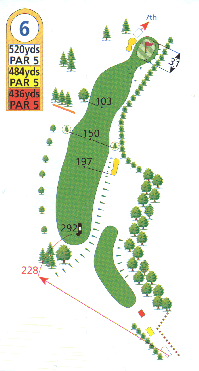
A great genuine three shotter, Kestrels Ridge requires an accurate drive as you make your way along the edge of the ‘Cotswold Edge’ escarpment. The second shot needs to put you in position for your third to the large green. Danger lurks with the trees and the slope the right of the hole, but sensible play will see you walk away with a par here, which is a fine score.
Pro’s Advice
The BIG ONE. A good drive towards the marker post, a nice fairway wood straight to the middle of the fairway and you are left with a simple third onto the green. However, many golfers have found variations to this at their cost.
Member’s Advice
A tough driving hole this off the white tees and it always makes your knees knock, and your hands sweat as you stand on the tee. It’s a genuine three shotter that, even with the drive successfully negotiated, it still demands a good second shot and an accurate third if you are to make par or even birdie. Always glad to get this one out of the way, and if you make a par, give yourself a pat on the back!
For the Ladies
A tough driving hole but not nearly as bad as for the men. Even the longest of women hitters would rarely reach the green in two, so it is a genuine par 5. As stroke index 1 on the Ladies card a par is a good, a birdie a definite bonus!
Hole 7 (Swanley)
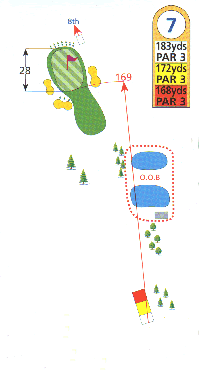
A raised tee gives you a good view of this medium length par 3, which is guarded by three bunkers. At 28 yards deep, the green is fairly generous, while the two ponds to the right of the tee don’t come into play.
Pro’s Advice
The second Par 3, but this time only a medium length with the main trouble being bunkers in front as well as on the left and right.
Member’s Advice
A mid to long iron can even be a small wood for some players in the breezier conditions, but this is a nice mid range par 3 where even hitting the green can sometimes leave you with a long, tricky putt. But make the most of your chances here as the longest hole on the course follows – the 8th…
For the Ladies
Another relatively long par 3; difficult to par for most. If you have the length off the tee you will almost certainly be playing a long iron or wood into a left to right cross wind. The right greenside bunker will catch many of these shots. If you can’t reach off the tee, then the second shot – a pitch or chip will be relatively straightforward. The green is large with only a gentle borrow from right to left.
Hole 8 (Beech Piece)
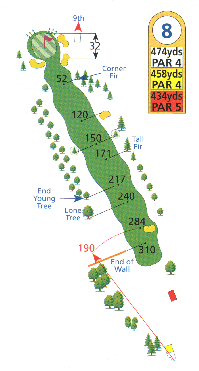
As long as a par 4 can be, Beech Piece deserves its Stroke Index 1 status. To clear the dry stone wall which extends out into the fairway, you need to carry 164 yards from the back tee, while a bunker to the right will take a carry of at least 190 yards if you are to make it over. Then its a long straight shot for your second to an excellent large green, guarded at the front and to the right by hungry bunkers.
Pro’s Advice
This hole is a good par 4 to get at any time. Only one yard short of a par 5, just about says it all. A good drive is essential.
Member’s Advice
The longest par four on the course and it feels like it when you hit your Sunday best drive and still need a fairway wood or a long iron for your second shot! For the shorter hitter, the key is to play it as a par 5 (which it very nearly is anyway) and make the most of the strokes you receive, as this is Stroke Index 1 after all. At the end of the long fairway, the green is big and always well manicured, but it does mean that going in with a long iron you can sometimes be left with a very long putt (or three!)
For the Ladies
This is a good par 5, easily reachable in 3 for most and reachable in 2 for the longer hitters. The tee shot is important; the bunker on the right can catch the mid to high handicappers tee shot, the wall on the left can also be an annoyance. If your tee shot avoids both then there is no reason why you shouldn’t be able to get yourself in good position for a 3rd shot (or even 2nd) into the green. This hole is not nearly as difficult as the mens by virtue of it being a par 5 to the mens par 4.
Hole 9 (Probus)

A bunker at around 200 yards will catch the pushed tee shot at ‘Probus’, but the real test is the second shot to a raised two-tiered green. The front of the green slopes, so a shot left short will run back off the green. Two bunkers guard the sides of the green, while the steep slope at the back of the green means you must either be confident of hitting the green, or be prepared to lay-up short and get up-and-down in two.
Pro’s Advice
Not a long par 4, but the second shot to the green is critical, as it tends to throw the ball off either side. This could lead to one or more tricky bunker shots.
Member’s Advice
A nice driving hole right in front of the clubhouse, the challenge with the 9th hole is the second shot. The green is elevated with has two levels and the further you are back down the fairway, the harder it is to hit. However, laying up in the dip at the front of the green is always a good option, while ending up in either of the side bunkers is not. A great green for putting on though, as you try to work out the borrows over the different levels.
For the Ladies
A tricky hole no matter what standard you are. For the mid to high handicappers the bunker on the right might catch your tee shot; for the low handicappers position is all important. The shot into the green is difficult from anywhere except the middle of the fairway. The green is narrow and tiered. Bunkers lurk right and left and catch anything but a good shot. If you are bunkered then anything from a 6,7,8,9,10, could result!! If you do get on the green and are on the lower tier and the flag is on the upper, then a 2 putt is a good result!
Hole 10 (Pucks Path)
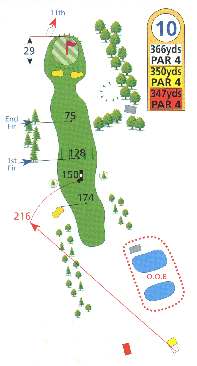
The longer tee shots over the two ponds will run down the slope to give you a very short second shot, although you can run out of fairway if you hit it too far to the left. The green slopes way from you, so stopping your second shot can sometimes be difficult, but the is plenty of room left and right of the green for those who hit slightly off line.
Pro’s Advice
A blind tee shot over the hill. Just right of the marker is favoured if you want to stay on the fairway. The approach shot must land on the front of the green as it slopes away from you.
Member’s Advice
A blind tee shot over the ponds to the top of the slope is the option most choose here, as it gives you an excellent view of the well guarded green below, and magnificent views of the Gloucestershire countryside in the valley beyond. As the green slopes away from you, holding the green demands a high shot in, while putting is never easy up or down the slope.
For the Ladies
A blind tee shot with ponds which are out of bounds to the right. The marker post is the line and if you reach it you will have a good view of the green. If you are short you have another blind shot. Two bunkers guard the front of the green. As the green slopes away from you, holding the green demands a high shot in.
Hole 11 (Lily Pond)
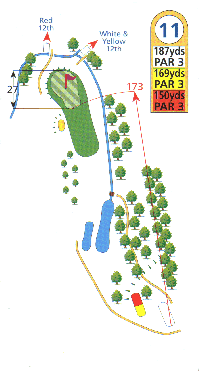
Another picturesque hole. The green is always receptive, but danger lurks on the right with a stream and trees, while to the left is a slope that could kick your ball further away. Hit it too long, and you will again find the stream.
Pro’s Advice
Welcome to the bottom 8 holes. Now the contrast begins. A very good drop hole par 3 with trouble on the right, through the green and on the left. A good shot is called for.
Member’s Advice
This can be quite a daunting shot if you’re not too sure or straight with your irons. To the right is a stream and a heavily wooded slope, so the bail out shot is to the left – assuming of course that you miss the large green. There is however, a fair slope running down to the green, so hitting it a couple of clubs short shouldn’t spell disaster.
For the Ladies
This hole can be played a number of ways. If you hit a straight shot you can play short and let the slope take the ball onto the green. If you play a full shot the ball should hold the green, however if you are in anyway intimidated and your ball striking is a bit suspect then danger lurks! Immediately in front of you are ponds and bushes, all down the right hand side is a ditch and woods, to the left of the green is a bunker and even further left another ditch. Even when you do get the ball on the green you cannot be assured of two putts. Depending of where the flag is, this has become the most tricky putting green.
Hole 12 (Woodmore Lake)
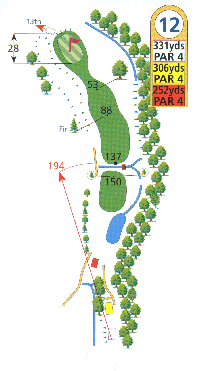
Woodmore Lake is decision time. With another stream at 197 yards, do you lay up short (between the stream and the lake), or do you grip it and rip it to leave a wedge to the contoured green? If you go for the carry, it demands a straight drive, otherwise the steep wooded slope on the right of the fairway, or the raised back to the left could gobble up your ball.
Pro’s Advice
A demanding tee shot visually but a dead straight, well struck drive should reap rewards. Watch out for the green though, the borrows can be tricky.
Member’s Advice
One of the toughest holes on the course, but one that rewards the brave. Take a wood off the tee and you can clear the lateral water hazard, which leaves a very short iron to the concave green Alternatively you can lay up off the tee with an iron. Get it wrong however, and danger lurks on all sides. A wooded slope to the right usually fails to give up stray balls, while a pond in front of the lay up area, the stream at 190 yards and the slope down to the 13th fairway to the left all add to the decision making process as you stand on the elevated tee.
For the Ladies
Decision time off the tee; do you play short of the ditch with a short iron or do you go for it and try and carry the ditch?? The carry is only around 110 yards, so for most average ladies it shouldn’t be a problem. But it is!! There are probably more duffed tee shots on this hole than anywhere else. For the longer hitters there is no real advantage taking the driver, a long iron or 5 wood will put you in position for a short shot to the green.
Hole 13 (Plummers Moor)
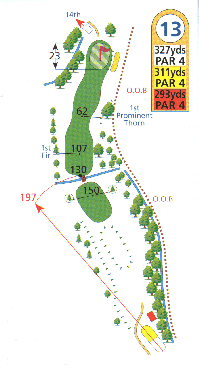
A wonderful elevated tee where it’s worth taking time to savour the view of Synwell and Wotton-under-Edge in the valley below. You can either lay up short of the stream, or go for the drive to carry it, which is made shorter by the fact that the fairway is well below the tee. The second slope is usually from a hanging lie, while the slope of the green will test you putting skills.
Pro’s Advice
Back over the stream with a fall to the right. Your second shot should be a short one but not easy, the green falls from the front down to the right also.
Member’s Advice
This is another tough hole. Most take on the carry over the stream, but it nearly always means a hanging lie for your second shot and if you can get your ball to hold on the green, you are faced with some challenging slopes. A two putt here is always a good result!
For the Ladies
This is a tough hole – especially for visitors. The ditch is reachable off the tee for the medium to long hitters, but low handicappers should easily be able to clear it. The second shot is demanding whichever club you have in your hand. You need to aim left of the green despite there being a ditch and hedge, as everything falls away from left to right. The green has borrows that are impossible to see or believe. If you are above the hole in summer, then pray!
Hole 14 (Woodmore Brake)
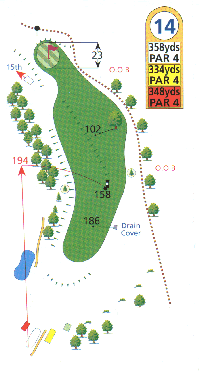
A 90 degree dogleg to the left, Woodmore Brake requires that you lay up near the marker post, to leave a medium iron to the green. However, at the turn of the fairway, there are some interesting contours to the green which can sometimes leave with a blind second shot.
Pro’s Advice
Watch out here, you will only need a medium iron off the tee as it is a right angle par 4 to the left. Once your shot is in place, the rest should be straight forward, assuming you don’t let your tee shot drift too far to the right.
Member’s Advice
A blind tee shot usually means a mid iron to the corner of the dog leg (unless you fancy taking on the tiger line over the trees – always dodgy), then a second blind shot to the green with a mid to short iron. The green is big and very receptive, so a par is a good score, and a birdie a real bonus.
For the Ladies
Stroke index 2 should give you a clue as to the difficulty of this hole – even for the low handicappers. Too long off the tee and you can find yourself out of bounds, too short and you haven’t a hope of getting near the green in 2. Too far right of the marker post and you face 2 more full shots to the green, too far left of the marker and you are blocked out for your next shot. On top of all that your shot to the green is usually blind, so to come off the hole with a nett par or bogey is usually a good result.
Hole 15 (Flaxley)
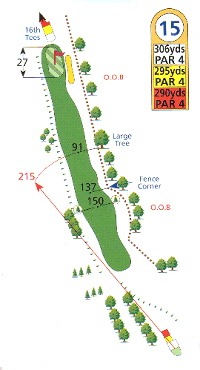
While only stroke index 15, Flaxley is a tough test of nerve. From an elevated tee, there is out of bounds on the right and a steep slope on the left of a narrow fairway. The sensible play is an iron off the tee for accuracy to leave a medium to shot iron to an always receptive green.
Pro’s Advice
A fairway as wide as a footpath. Nothing another straight hit can’t put right though. However, the green can throw shots off if they land right of centre.
Member’s Advice
This can be a real card wrecker if you let it. A lush fairway from an elevated tee and a green just 300 yards away tempts you to have a pop with the driver, but don’t say you didn’t know what to expect, as you can see all the danger from the tee! The fairway is narrow, the trees to the right conceal the out of bounds for the sliced shot, and the steep bank on the left means a tough second shot with a hanging lie. Unless you’re feeling brave, take an iron, find the fairway, find the green, two putt and move on with your card in tact!
For the Ladies
As for the men, this can be a card wrecker. The fairway is very narrow with out of bounds on the right. If you are shortish off the tee,but straight, then even the straight shot can land you in bother – as the landing area kicks everything to the right and you can find yourself blocked out for your second shot. For the longer hitters, the line is over the big tree on the left and hope it misses the branches. The bank should bring the ball back into the fairway. For the single figure ladies, the bail out shot is left, the go for broke shot is go for the green with the driver, the safe shot an iron off the tee.
Hole 16 (Briery Brake)
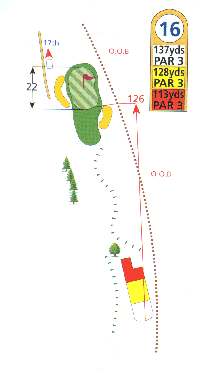
A beautiful short par three, bounded by trees on the right. Only potential problems are presented by the deep bunker front right, or the long narrow bunker to the left of the green, which could leave you with a nerve racking shot, as the trees opposite beckon for the dreaded ‘thinned’ sand wedge.
Pro’s Advice
The short par 3, the only problems being the bunker in front and to the left of the green.
Member’s Advice
A lovely little hole which can play anything from a sand wedge to a six iron if the wind blows. A big, receptive green offers lots of chances for the elusive two, but beware of the steep faced bunker to the front right and the ribbon bunker to the back left.
For the Ladies
The easiest of the par 3’s, this hole can still jump up and grab you if you don’t pay it due respect. Correct clubbing off the tee is crucial – if you are short you may find yourself in the front right bunker or be faced with a possible 3 putt or difficult chip. If you are long you could also be bunkered and have little chance of getting up and down.
Hole 17 (Hareley)
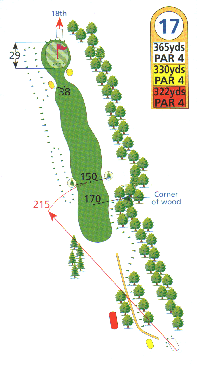
The idyllic setting in a quiet corner of the course belies the toughness of the tee shot which shouts “don’t go right, or you’ll struggle to find your ball on the heavily wooded slope”. Once the fairway is found, you’re faced with a shot to the raised green where two guarding bunkers shouldn’t present too many problems.
Pro’s Advice
A nice driving hole, so nice in fact, some people have two or three goes at it. The right hand side must be avoided to save any distress, but after that there are not too many problems.
Member’s Advice
The tee shot is the toughest part of this hole, as you drive down a shoot of trees to a beautifully lush fairway. The second shot is to the elevated green, so check your distances, but this is a wonderful golf hole – providing it isn’t you that ends up in the trees to the right of the fairway!
For the Ladies
The tee shot is not nearly as difficult as the mens, but requires some care. The 16th green and bunkers are directly in front of you and can be intimidating for the faint hearted. For the longer hitters the trees on the right can catch a slice. Too far left and you are either in the large conifers or down the bank by the 15th. The shot to the green is deceptive – it takes one more club than you think due to the elevation of the green, however if you are too long and over the back, then you have little chance of getting up and down!
Hole 18 (Watcombe Brake)
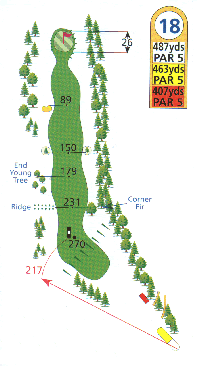
A superb finishing hole, Watcombe Brake climbs to the top of the hill, to a long straight fairway. A bunker 89 yards out is there to catch the second shots played to the lay up point, while the well manicured green has a few subtle slopes to test your putting skills before your card is complete.
Pro’s Advice
Over the hill and home. A good drive to the right of the post may bring the green within reach and help to yield a closing birdie, before retiring to the clubhouse for well deserved refreshment.
Member’s Advice
Last hole, but there is still the steep slope to negotiate with your tee shot (and probably your second shot too!), then its a long fairway to the green with trees beckoning to the right. You are always happy to finish with a par here.
For the Ladies
A good par 5 in that it gives you a good chance of a par or nett par and a realistic chance of a birdie or nett birdie.The tee shot is all uphill and the marker post is a good line.(Longer hitters need to be right of the marker). If you get to the top you can see the green, but few can reach in 2 so be sensible and play a shot to avoid the bunker on the left or the trees on the right. The green is receptive and large but beware of your lie with the shot to the green – there is a subtle left to right slope and this will send the ball right of the target.